

Ever wondered what really moves market prices? A big piece of the puzzle is understanding buy side liquidity vs sell side liquidity. It’s a game-changing concept whether you’re navigating the markets with an online forex broker or looking at other assets. Think of it as understanding where the big pools of orders are hiding. This article will break down exactly what buy side and sell side liquidity are, why they’re so crucial for traders, and how you can use this insight to make more informed decisions.

What is Liquidity in Financial Markets?
Imagine a bustling marketplace. Liquidity is like the ease with which goods (or in our case, financial assets) can be bought and sold without causing a major price ruckus. In essence, it’s a measure of how many buyers and sellers are present and whether trades can happen quickly and smoothly at stable prices. For anyone involved in trading, especially with a forex trading broker, good liquidity means your orders get filled fast and at the price you expect, or very close to it.

Why Understanding Liquidity Matters
So, why should you care about liquidity? If a market isn’t very liquid, trying to buy or sell can be like trying to wade through treacle – slow, and you might not get the price you want. This can lead to what’s called ‘slippage,’ where the price moves against you between the time you place your order and when it actually executes. High liquidity, on the other hand, usually means tighter spreads (the difference between buying and selling prices) and a smoother trading experience. This is fundamental, whether you’re looking at buy side liquidity vs sell side liquidity or general market health.
Core Concepts: Diving Deeper into Liquidity
At its heart, liquidity is the lifeblood of any financial market. It ensures that assets can be traded efficiently. When we talk about high liquidity, we mean there are plenty of willing buyers and sellers, meaning you can trade without significantly impacting the asset’s price. Low liquidity is the opposite: fewer participants, wider gaps between buy and sell prices, and your trades could cause noticeable price swings.
How Liquidity Underpins Trading and Price
Think of it this way: liquidity makes the market’s wheels turn. Without it, prices would be jumpy and unpredictable. For a trader using a broker for forex, strong liquidity means they can get in and out of trades with confidence. The constant dance between buy orders and sell orders, which forms the basis of buy side liquidity and sell side liquidity, is what creates price movement and opportunities.
Understanding Buy Side Liquidity
Let’s get practical. Buy side liquidity refers to clusters of buy orders waiting in the market. You’ll typically find these pools of buy orders just above significant resistance levels or recent swing highs. Why there? Well, traders who are short (betting on prices going down) often place their stop-loss orders there. Also, breakout traders might place buy-stop orders to jump in if the price breaks higher.

Why Buy Side Liquidity Forms
The formation of buy side liquidity is a fascinating mix of market psychology and mechanics. When a price level has acted as a ceiling (resistance), many traders anticipate that if the price breaks above it, it will continue to rise.
- Stop-Loss Clusters: Short sellers place stop-losses to limit their losses if the price moves against them. These are essentially buy orders.
- Breakout Entries: Traders looking to capitalize on upward momentum place buy-stop orders above resistance.
- Profit Taking (for Shorts): Some short sellers might also set buy limit orders to take profit if the price dips and then heads towards their initial entry area (which might now be above current price if the market moved substantially lower first).
This collective behavior creates a concentrated zone of buying interest, which larger institutions might see as an opportunity to fill their large sell orders. The presence of buy side liquidity offers them a chance to sell without causing too much downward price pressure initially.
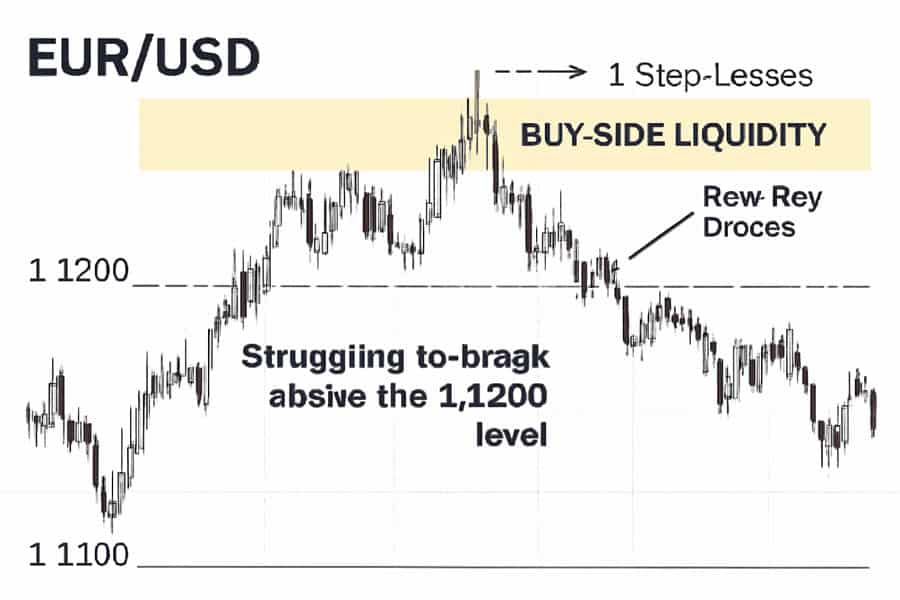
Real-World Example: Spotting Buy Side Liquidity
Imagine the EUR/USD currency pair has struggled to break above 1.1200 several times. You can bet that just above this 1.1200 level, there’s a significant amount of buy side liquidity. This includes stop-losses from those who sold at or below 1.1200, and new buy orders from traders expecting a breakout. Charting tools can help visualize these potential zones.
Understanding Sell Side Liquidity
Now, let’s flip the coin. Sell side liquidity is where sell orders are concentrated, typically found below significant support levels or recent swing lows. When the price drops into these zones, it triggers stop-loss orders from traders who were long (betting on prices going up) and sell-stop orders from those anticipating a breakdown.
Why Sell Side Liquidity Forms
Similar to its counterpart, sell side liquidity builds up due to common trading behaviors and expectations. Key support levels, where price has previously found a floor, are common spots.
- Stop-Loss Clusters: Long traders place stop-losses below support to protect their profits or limit losses. These are sell orders.
- Breakdown Entries: Traders anticipating further downward movement place sell-stop orders below support.
- Profit Taking (for Longs): Some long traders might set sell limit orders to take profit if the price rallies and then pulls back towards their initial entry area (which might now be below current price if the market moved substantially higher first).
This accumulation of selling interest forms a pool of sell side liquidity. Institutions looking to buy large quantities might target these zones, as the triggered sell orders provide the necessary volume for them to enter their positions. Understanding both buy side liquidity and sell side liquidity is key to anticipating these institutional moves.
Real-World Example: Spotting Sell Side Liquidity
Let’s say the S&P 500 index has consistently found support around the 4500 level. Below this level, you’d expect to find a build-up of sell side liquidity. This would be a mix of stop-loss orders from those who bought around 4500 and new sell orders from traders anticipating a drop if that support breaks.
Buy Side vs Sell Side Liquidity: Key Differences
While both are pools of orders, the distinction between buy side liquidity vs sell side liquidity is vital for understanding market dynamics and anticipating price action. They occur in different places and are targeted by institutions for opposite reasons.
Read More: what is stop hunt in forex
Comparative Table
| Feature | Buy Side Liquidity | Sell Side Liquidity |
| Location | Above key resistance, swing highs, equal highs | Below key support, swing lows, equal lows |
| Order Types Triggered | Buy stops (new entries), stop-losses from short positions | Sell stops (new entries), stop-losses from long positions |
| Immediate Market Effect When Hit | Price spikes upwards as buy orders are filled | Price drops downwards as sell orders are filled |
| Typical Institutional Strategy | Institutions may sell into this buying interest to offload large positions or initiate shorts. | Institutions may buy into this selling interest to accumulate large positions or initiate longs. |
| Common Trader Emotion Targeted | FOMO (Fear Of Missing Out) on breakouts; pain for short sellers. | Fear/panic on breakdowns; pain for long holders. |
How Each Influences Price and Volatility
When price reaches a zone of buy side liquidity, the sudden influx of buy orders can cause a sharp, quick rally. If institutions are selling into this rally, the price might then reverse, creating a “bull trap” or “stop hunt.” Conversely, when sell side liquidity is hit, the triggered sell orders can cause a rapid price drop. If institutions are buying into this drop, a reversal might follow, forming a “bear trap.” Both scenarios often lead to increased short-term volatility. The interplay between buy side liquidity and sell side liquidity is a constant driver of these dynamic movements.
When and Why Institutions Target Each Type
Institutions, or “smart money,” often need to execute very large orders. If they just dumped a massive sell order onto the market, they’d push the price down too quickly against themselves. Instead, they look for areas of buy side liquidity where they can discreetly sell their shares to the eager buyers whose stops and breakout orders are being triggered. Similarly, they target sell side liquidity to accumulate large buy positions without immediately driving the price up. This strategic interaction with buy side liquidity vs sell side liquidity is a hallmark of institutional trading.
How to Identify Liquidity Zones in Practice
Alright, let’s get down to brass tacks. How can you actually spot these important liquidity zones on your charts? It’s a blend of technical analysis and understanding market behavior.
Read More: Identify Order Blocks in Forex

Step-by-Step Guide to Finding Liquidity
- Mark Key Support and Resistance: These are your primary hunting grounds. Horizontal levels where price has reacted multiple times are significant.
- Identify Swing Highs and Lows: Obvious peaks and troughs on your chart are where traders often place stops or look for breakouts/breakdowns. Equal highs or lows are particularly potent.
- Look for Price Rejection: Areas where price tried to break through but was sharply rejected (leaving long wicks on candles) often indicate liquidity was tested or is building.
- Volume Analysis: Spikes in volume when price approaches these key levels can confirm that orders are being triggered.
- Order Flow (Advanced): Tools like Depth of Market (DOM) or order book visualizers can show actual pending orders, though this is more common in futures or some direct market access equity platforms.
Tools and Indicators for Liquidity Hunters
While basic chart analysis is key, some concepts and tools can enhance your liquidity-spotting skills:
- Order Blocks: In ICT/SMC (Inner Circle Trader/Smart Money Concepts), an order block is a specific candle pattern that often precedes a strong move, indicating where institutions may have placed significant orders. These areas often become liquidity zones later.
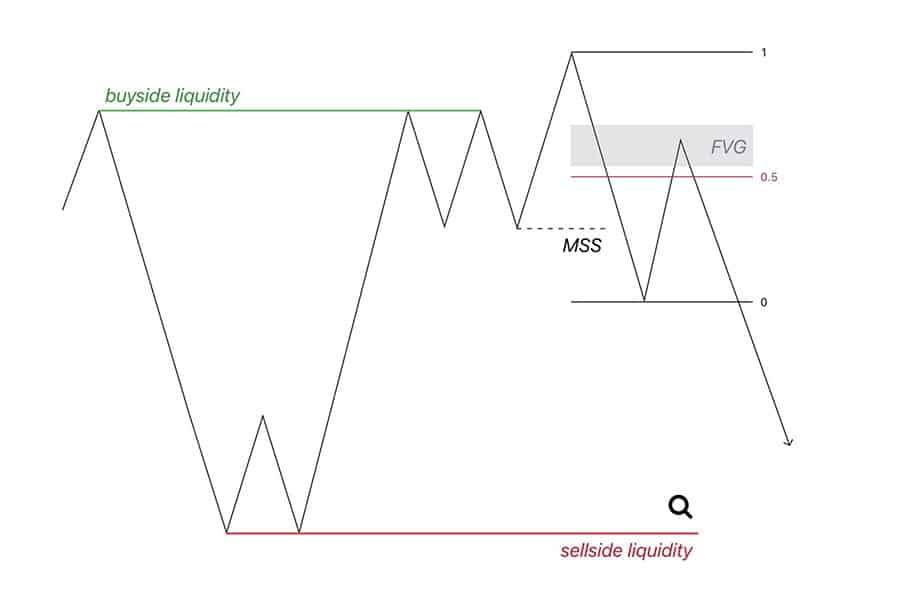
- Liquidity Pools/Voids: This is a more conceptual term for the zones above highs (buy side liquidity) and below lows (sell side liquidity). A “liquidity void” might refer to an area where price moved very quickly, suggesting few orders were there to stop it, and price may revisit it.
- Fair Value Gaps (FVG) / Imbalances: These are gaps between candles indicating a strong, one-sided move. Price often returns to fill these gaps, potentially interacting with liquidity.
These advanced concepts often look at buy side liquidity and sell side liquidity from an institutional perspective.
Chart Walkthrough: Marking Up Liquidity
Open up a chart of your favorite asset.
- Pick a timeframe (e.g., H4 or Daily for a broader view).
- Draw lines at clear swing highs and swing lows.
- Observe areas where price has created “equal highs” or “equal lows” – these are magnets for liquidity.
- Notice how price reacts when it approaches these levels. Does it spike through quickly and then reverse? That’s often a liquidity grab.
- Consider using a rectangle tool to highlight these zones above highs (for buy side liquidity) and below lows (for sell side liquidity).
Trading Strategies Using Buy Side and Sell Side Liquidity
Now for the exciting part: how can you actually use this knowledge to trade? Understanding buy side liquidity vs sell side liquidity isn’t just academic; it can form the basis of powerful trading strategies.
Anticipating Liquidity Grabs (Stop Hunts)
A “liquidity grab” or “stop hunt” is when price briefly pokes above a key high (tapping into buy side liquidity) or below a key low (tapping into sell side liquidity) only to reverse sharply.
- How to Spot Them: Look for price approaching obvious highs/lows. A quick, often lower-volume spike through the level followed by a strong rejection candle (like a pin bar or engulfing pattern) can signal a grab.
- How to Avoid Being a Victim: Don’t place your stops exactly at the swing high/low. Give them a little breathing room, or wait for confirmation after the level is breached before assuming a breakout.
Entry and Exit Strategies Around Liquidity Zones
You can build strategies around these concepts:
- Fading Liquidity Grabs: After you see price sweep a liquidity zone (e.g., spike above a high) and then show signs of reversal (e.g., a bearish engulfing candle), you could enter short, anticipating the “smart money” has engineered the move to sell. Your stop would go above the high of the sweep.
- Trading Towards Liquidity: If the broader trend is up, and price pulls back towards a known area of sell side liquidity (e.g., below a recent low), you might look for buying opportunities if price sweeps that liquidity and then shows signs of strength, anticipating institutions are accumulating.
- Profit Targets: Use opposing liquidity zones as potential profit targets. If you’re long after a sell-side liquidity grab, your target might be the next significant area of buy side liquidity.
Risk Management: Staying Safe
Trading around buy side liquidity and sell side liquidity inherently involves volatility.
- Stop Placement: Place stops logically beyond the zone of the liquidity sweep you’re trading against.
- Position Sizing: Adjust your size based on the volatility and the distance to your stop.
- Confirmation: Don’t just jump in because a level is hit. Wait for some form of price action confirmation that supports your trade idea.
ICT/SMC Methods for Advanced Traders
Traders using Inner Circle Trader (ICT) or Smart Money Concepts (SMC) have very specific setups based on how institutions manipulate price around buy side and sell side liquidity. These often involve identifying “order blocks,” “breaker blocks,” “mitigation blocks,” and “fair value gaps” in conjunction with liquidity sweeps. These methods require significant study and practice but offer a detailed framework for understanding institutional order flow.
Practical Tips and Common Mistakes
Navigating the nuances of buy side liquidity vs sell side liquidity can be tricky at first. Here are some tips to help you trade more effectively and avoid common pitfalls.
Read More: Identify Inducement in Forex
Avoiding Getting Caught in Liquidity Sweeps
The dreaded stop hunt! One moment you think the breakout is real, the next you’re stopped out, and price reverses.
- Be Wary of Obvious Levels: If everyone can see a support or resistance level, it’s a prime target. Don’t assume it will hold or break cleanly.
- Look for “Inducement”: Sometimes price will make a small, false move towards liquidity to encourage traders to take positions, only to reverse and hit their stops before the real move.
- Consider Session Timings: Liquidity grabs often occur around market opens (e.g., London open, New York open) when volatility increases.
Recognizing False Breakouts and Market Manipulation
A key skill is distinguishing a genuine breakout from a liquidity grab.
- Volume is Key: A true breakout usually has strong volume supporting it. A low-volume poke through a level is suspicious.
- Candlestick Patterns: Look for long wicks rejecting the new price level, or immediate strong candles in the opposite direction after the “break.”
- Failure to Follow Through: If price breaks a level but then stalls and fails to make further progress, it’s often a sign the breakout was false.
Best Practices for Safer, More Effective Trading
To integrate liquidity analysis successfully:
- Patience is a Virtue: Wait for price to reach key liquidity zones and for clear signals before entering. Don’t chase.
- Context Matters: Always consider the higher timeframe trend. Trading with the dominant trend, even when using liquidity concepts, often yields better results.
- Keep a Journal: Document your trades, especially those based on buy side liquidity and sell side liquidity. Note what worked, what didn’t, and why. This is invaluable for learning.
- Start Small: Practice these concepts on a demo account or with small position sizes until you’re comfortable.
Real-World Applications
The concepts of buy side liquidity and sell side liquidity aren’t just theory; they are actively used by professional traders and financial institutions every single day to make decisions.
How Professionals Use Liquidity Zones
Large institutions don’t just randomly place orders. They strategically target areas of buy side liquidity to sell their large positions without causing the price to plummet against them. Conversely, they target sell side liquidity to accumulate large buy positions without sending prices soaring prematurely. They might even engineer price moves to trigger these liquidity pools. For them, understanding where the orders are is paramount for efficient execution.
Case Studies: Liquidity in Action
Consider a stock that has repeatedly failed to break above $50 (a clear resistance with buy side liquidity above it). One day, news hits, the stock surges past $50, triggering all those buy stops. Retail traders jump in, expecting a continued rally. However, large institutions might use this surge of buying to unload their shares. The price then quickly reverses, falling back below $50, trapping the breakout buyers. This is a classic example of buy side liquidity being targeted for distribution. The same can happen in reverse with sell side liquidity below a key support.
Practical Checklist for Analyzing Liquidity
Before you place a trade, run through this quick mental checklist:
- Where is the nearest significant buy side liquidity (above recent highs/resistance)?
- Where is the nearest significant sell side liquidity (below recent lows/support)?
- Is price currently heading towards one of these zones?
- What is the overall market trend on higher timeframes?
- If price reaches a liquidity zone, what kind of price action would confirm a liquidity grab versus a genuine continuation?
- How does this liquidity picture affect my stop placement and potential profit targets?
Thinking about buy side liquidity vs sell side liquidity this way can add a powerful dimension to your trade planning.
Opofinance Services
To effectively trade using concepts like buy side liquidity vs sell side liquidity, having a reliable regulated forex broker with advanced tools is a huge advantage. Opofinance, regulated by ASIC, provides a suite of services designed for serious traders:
- Advanced Trading Platforms: Choose from industry-standard MT4, MT5, the sophisticated cTrader, or their proprietary OpoTrade platform. These platforms offer the charting tools necessary to identify and analyze liquidity zones effectively.
- Innovative AI Tools: Leverage cutting-edge technology with their AI Market Analyzer, AI Coach, and AI Support to gain deeper insights and refine your strategies around buy side liquidity and sell side liquidity.
- Social & Prop Trading: Learn from and connect with a community of traders. Opofinance also offers pathways into proprietary trading, allowing skilled traders to manage larger capital.
- Secure & Flexible Transactions: Enjoy peace of mind with safe and convenient deposit and withdrawal methods, including options for crypto payments, all with zero fees charged by Opofinance.
These features make Opofinance a strong partner for traders looking to apply sophisticated market analysis. Their platforms are well-suited for spotting the subtle clues that point to where buy side liquidity and sell side liquidity might be building up.
Ready to equip yourself with professional-grade tools and insights? Explore what Opofinance has to offer and take your trading to the next level.
Conclusion
Grasping the dynamics of buy side liquidity vs sell side liquidity can truly transform your trading perspective. It’s about seeing the market not just as lines on a chart, but as a landscape of orders where institutions strategically operate. By learning to identify these key zones, you can better anticipate market moves, avoid common traps like stop hunts, and potentially align your trades with the flow of “smart money.” It’s a crucial step towards more insightful and strategic trading.
Key Takeaways
- Buy side liquidity clusters above resistance/highs (buy stops, short-seller stops).
- Sell side liquidity clusters below support/lows (sell stops, long-holder stops).
- Institutions often target these zones to fill large orders, sometimes engineering “liquidity grabs” or “stop hunts.”
- Identifying these zones involves looking at support/resistance, swing points, and volume.
- Trading strategies can be built around fading liquidity grabs or trading towards liquidity targets.
- Always use risk management and look for price action confirmation.
- Understanding buy side liquidity vs sell side liquidity helps you see beyond simple breakouts or breakdowns.
What’s the biggest mistake traders make regarding liquidity zones?
One of the most common mistakes is placing stop-loss orders exactly at obvious swing highs or lows. These are precisely the points where liquidity pools, making them prime targets for stop hunts. A slightly wider stop, or waiting for confirmation after a level is breached, can often save traders from being prematurely taken out of a good potential move.
How can I use liquidity analysis in very volatile or fast-moving markets?
In highly volatile markets, liquidity zones can be hit and swept very quickly. It’s often wiser to focus on higher timeframe liquidity levels (e.g., daily or 4-hour) as these tend to be more significant. Wait for clearer price action signals after a liquidity zone is approached, like a strong rejection candle or a shift in market structure on a lower timeframe, before committing to a trade. Trying to trade every minor liquidity grab in a fast market can lead to overtrading.
Do these concepts of buy side and sell side liquidity apply equally to all asset classes like forex, stocks, and crypto?
Yes, the fundamental principles of buy side liquidity and sell side liquidity apply across virtually all traded markets. Wherever there are orders being placed (stops, entries, profit targets), liquidity zones will form. The specific behavior and the clarity of these zones might vary slightly based on market structure and participant types (e.g., more algorithmic trading in forex might create sharper grabs), but the underlying concept of price being drawn to pools of orders remains consistent.


One Response
Very teaching information about buying sell sides liquidity.