

Ever watch the market bounce up and down and wish you could profit from those swings without having to perfectly predict the next big move? It can be tough constantly trying to guess market direction, especially when using a new forex trading broker. That’s where the Grid Trading Strategy comes in. Think of it like setting up a net across a price range.

This strategy involves placing a series of buy and sell orders at specific intervals, aiming to catch small profits as the price fluctuates back and forth. It’s a systematic way to potentially capitalize on market volatility itself using a specific grid trading strategy. In this article, we’ll dive deep into how this approach works, its pros and cons, and how you can implement it, particularly in Forex markets.
What is a Grid Trading Strategy?
So, what exactly is this strategy? Put simply, a Grid Trading Strategy is a technique where you place multiple orders above and below a chosen price. You’re creating a ‘grid’ of orders. Instead of betting on which way the market will go long-term, you’re setting up to profit from the natural up-and-down movements – the market ‘noise’. The core idea is to automatically buy when the price dips to certain levels and sell when it rises to others within your grid, aiming to lock in profits from these oscillations. Understanding this core concept is key to using any grid trading strategy effectively.
How Grid Trading Works in Practice
Let’s make this real. Imagine EUR/USD is sitting at 1.1000. Using a grid strategy, you might decide to set buy orders every 20 pips below 1.1000 (at 1.0980, 1.0960, etc.) and sell orders every 20 pips above 1.1000 (at 1.1020, 1.1040, etc.). When an order gets triggered, it usually has a pre-set take-profit target – often at the next grid line. If the price hits 1.0980, your buy order triggers, and you might set the take-profit at 1.1000.
If it goes up to 1.1020, your sell order triggers, with a take-profit perhaps set back at 1.1000. As the price wiggles within this range, trades are opened and closed, hopefully accumulating small profits along the way. The grid trading strategy relies on the price moving and crossing these predetermined levels.
Core Concepts of Grid Trading
Before jumping in, it’s vital to grasp the fundamental ideas behind grid trading. These are the knobs and dials you’ll use to build and manage your grid, influencing both its potential rewards and risks when setting up your grid trading strategy.
The principle: Profiting from Price Fluctuations
The heart of grid trading is accepting that markets wiggle. Prices go up, prices go down, often revisiting levels they were at previously. Instead of stressing about predicting the direction perfectly, grid trading embraces this back-and-forth movement. By setting up your ‘net’ of orders, you aim to automatically buy low and sell high within a specific zone. Each time a buy order triggers and the price climbs to the next level (or your take-profit), you bank a small gain. Each time a sell order triggers and the price drops, you do the same. The goal for this grid trading strategy is to stack up these small wins over time.
Read More: Scaling In and Out of Positions in Forex
Types of Grid Trading Strategies
Grid trading isn’t just one-size-fits-all. There are different flavors depending on your market outlook:
- Classic Grid: The standard approach. Buy orders below the start price, sell orders above. Best suited for markets you expect to stay within a range. Simple and logical.
- Geometric Grid: Similar setup, but position sizes might increase the further price moves against you (like Martingale). This ramps up the risk significantly – use with extreme caution.
- Dynamic Grid: A smarter grid that adjusts its spacing or range based on how volatile the market currently is, often using indicators like the Average True Range (ATR). It tries to adapt.
- Trend-Following Grid: Flips the logic. Instead of range-trading, it places orders in the direction of an established trend. If the market’s heading up, you place buy orders above the current price to catch pullbacks and add to your long position. If it’s heading down, you place sell orders below. This type of grid trading strategy requires trend identification.
Key Components
Building your grid involves defining these key parts:
- Grid Size (Spacing): How far apart are your orders? Measured in pips for Forex (e.g., 20 pips, 50 pips). Tighter spacing means more frequent trades, smaller potential profit per trade. Wider spacing means fewer trades, larger potential profit per trade. This is a crucial parameter in any grid trading strategy.
- Grid Range: The total zone your grid covers, from the lowest buy order to the highest sell order. Defines your operating area.
- Number of Grids (Levels): How many buy and sell orders make up your grid? This depends on the range and spacing. More levels mean more potential activity but also higher potential risk if the market trends hard.
- Position Sizing: How big is each trade (e.g., lot size)? Keeping this consistent and, more importantly, small relative to your capital is crucial for managing risk within the grid trading strategy.
Grid Trading Strategy for Forex
The Forex market, buzzing 24 hours a day and known for its constant movement, is a natural playground for the Grid Trading Strategy for Forex. Its characteristics often align well with what grid systems need to function, making a Forex Grid Trading Strategy a popular choice for many traders.
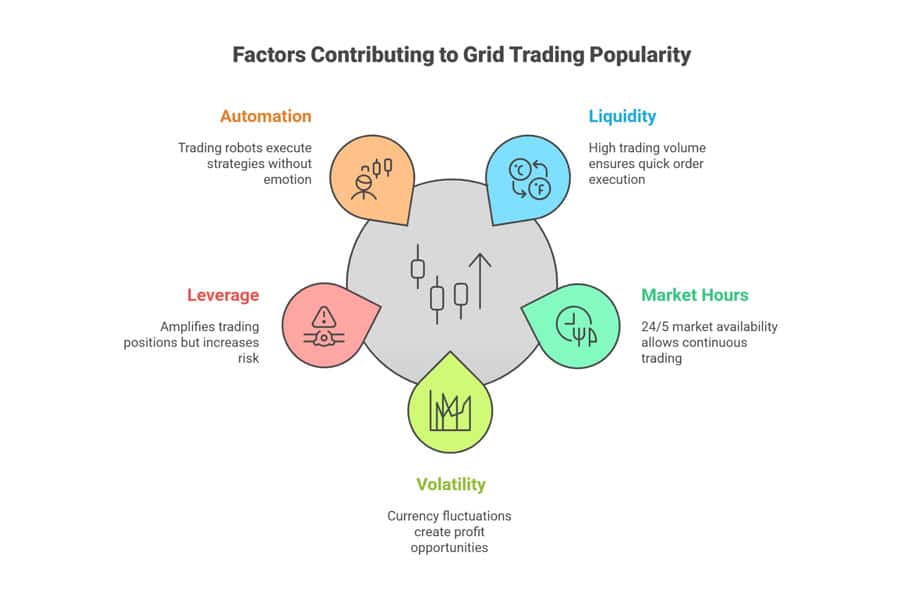
Why Grid Trading is Popular in Forex Markets
Why do traders often turn to a Forex Grid Trading Strategy? Several reasons:
- Plenty of Action (Liquidity): Major currency pairs usually have lots of buyers and sellers, meaning you can typically get your orders filled quickly and at the price you expect (low slippage). This is vital for a strategy relying on precise price levels.
- Always Open (24/5 Market): The market runs round the clock during the week, so automated grid strategies can work constantly, catching moves you’d miss while sleeping.
- Natural Swings (Volatility): Currencies are always fluctuating. Grid trading aims to turn this constant wiggle into profit, especially when pairs are stuck in a range.
- Leverage Availability: Forex brokers offer leverage, letting you control larger positions with less capital. This can seem helpful for opening multiple grid positions, but BEWARE: leverage dramatically increases risk. Use it very carefully with any grid trading strategy.
- Easy Automation: Platforms like MetaTrader allow for ‘Expert Advisors’ (EAs) – trading robots – that can run your Grid Trading System for Forex automatically, taking emotion and manual effort out of the equation.
Currency Pairs Best Suited for Grid Trading
While you can try grid trading on any pair, some tend to be more suitable, especially for classic range-bound grids:
- Range-Lovers: Pairs historically known for spending time moving sideways within predictable boundaries (e.g., sometimes EUR/CHF, AUD/NZD, though this changes!).
- Steady Movers: You need some movement, but pairs that are wildly unpredictable can break your grid range too easily. Major pairs (like EUR/USD, GBP/USD) can work, but their strong trends need careful risk management when applying a grid trading strategy.
- Low Transaction Costs: Since you might be making many small trades, pairs with tight spreads (the difference between buy and sell price) and low commissions are better for your bottom line. Majors usually win here.
The “best” pair really depends on the current market mood and which type of grid strategy you’re using. Always do your homework (backtesting!) before committing to a specific Forex Grid Trading Strategy.
Setting Up a Forex Grid Trading System
Ready to build your Forex Grid Trading Strategy? Here’s a step-by-step approach for setting up a grid trading system for forex:
- Pick Your Pair: Choose based on its typical behavior (ranging vs. trending) and costs (spreads).
- Read the Room (Market Analysis): Is the market currently drifting sideways or charging in one direction? Use charts, maybe tools like Bollinger Bands or ADX, to decide if it’s time for a range grid or a trend grid.
- Define the Playing Field (Grid Range): Set your upper and lower price limits. Look at recent highs/lows (support/resistance) or use volatility measures like ATR.
- Choose Your Starting Point: Often the current price, or maybe a central level like a moving average.
- Decide the Step Size (Grid Spacing): How many pips between orders (e.g., 25 pips)? Could be fixed or based on current volatility (ATR).
- Count the Rungs (Number of Levels): Your range divided by your spacing gives you the number of buy/sell orders.
- Manage Your Money (Position Size): Crucial! How big is each order (lot size)? Keep it small enough that even multiple open positions won’t blow up your account if things go wrong. This is vital for a sustainable grid trading strategy.
- Set Your Targets (Take-Profit): Usually, the next grid line. Buy at 1.1000, aim to take profit at 1.1025 (if spacing is 25 pips).
- Have an Exit Plan (Stop-Loss): Absolutely essential! Where do you cut losses if the market runs away? This could be a price level way outside your range, or a total loss limit (e.g., close everything if drawdown hits 20%). Don’t skip this in your grid trading strategy.
- Manual Labour or Robot Power?: Will you place and manage orders by hand (tough!) or use an automated EA/bot (recommended)?
Types of Forex Grid Trading Strategies
Within Forex, you can fine-tune your grid approach based on how you view the market’s direction. Exploring different types can help you find the best grid trading strategy for your style.
Range-Based Grid Trading
This is the classic grid. You set it up when you think the price will bounce around between two levels (support and resistance). Buys below the current price, sells above. You profit as it zig-zags. The danger? A strong breakout that leaves you holding multiple losing trades.
Trend-Following Grid Trading
Here, you’re not fighting the trend, you’re joining it. If you spot a clear uptrend, you place buy orders above the current price. As the price pushes up, pulls back slightly, then continues, it triggers your orders, adding to your winning position. In a downtrend, you do the opposite with sell orders below the price. The risk? The trend suddenly reverses, leaving you with positions entered late in the move.
Symmetrical vs. Asymmetrical Grids
A small distinction:
- Symmetrical: The spacing and trade sizes are the same on both the buy-side and sell-side. Neat and tidy.
- Asymmetrical: You might use different spacing or sizes for buys versus sells. Maybe tighter spacing for buys if you have a slight bullish feeling, for example.
Directional Grids
These grids have a built-in bias:
- With-the-Trend Grid: Just another name for the trend-following grid mentioned above. Only adds trades in the trend’s direction.
- Against-the-Trend Grid (Counter-Trend): This is like a classic grid but used during pullbacks within a larger trend. In a big uptrend, you might only place buy orders below the current price, hoping to catch dips before the main trend resumes. It’s riskier because you’re betting against the immediate momentum.
How to Implement a Grid Trading Strategy
Okay, let’s get practical. Setting up your Grid Trading Strategy involves some key decisions, whether you’re clicking buttons manually or programming a bot. Proper implementation is key to success.
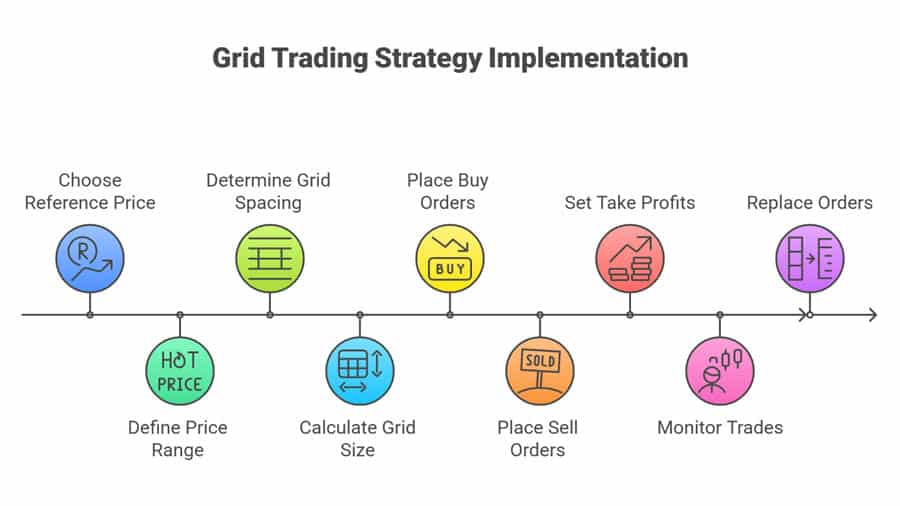
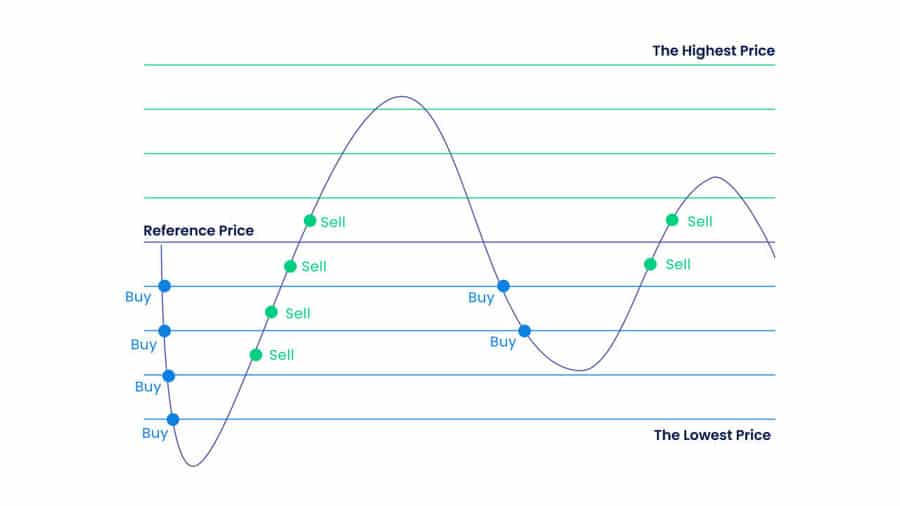
Choosing the Reference Price and Price Range
First up, pick your starting point – the reference price. This is often just the current market price, or maybe a level you think is significant, like a daily pivot point or a key moving average. Then, define your battlefield: the price range. Look at charts for recent highs and lows (support and resistance). Volatility tools like Bollinger Bands can also give you an idea of likely boundaries. Too tight a range, and the price might break out immediately. Too wide, and you might need a lot of capital or wait ages for trades.
Determining Grid Spacing and Grid Size
Next, decide on the spacing between your grid lines (orders). How many pips apart? This depends on how much the instrument usually moves (its volatility) and your preference. Using a percentage of the Average True Range (ATR) is a common way to adapt spacing to current conditions. Or, you can use fixed steps like 20 or 50 pips. Remember, closer spacing means more action but smaller wins per trade. Wider spacing means less frequent action but potentially bigger wins.
Grid size (the number of levels) comes from dividing your total range by your chosen spacing. Make sure the total potential risk (number of levels x size per trade) is something your account can handle when using this grid trading strategy!
Placing Buy and Sell Orders: Practical Examples
Let’s say GBP/USD is at 1.2500, and you opt for 25-pip spacing in a range grid:
- Reference Price: 1.2500
- Spacing: 25 pips
- Setup:
- Place Buy Limit orders down at: 1.2475, 1.2450, 1.2425…
- Place Sell Limit orders up at: 1.2525, 1.2550, 1.2575…
- Take Profits (Example):
- If the buy at 1.2475 triggers, its Take Profit (TP) goes at 1.2500.
- If the sell at 1.2525 triggers, its TP goes at 1.2500.
The system aims to capture that 25-pip profit each time price crosses an interval. It keeps doing this as long as the price moves within your grid setup.
Manual vs. Automated Grid Trading
- Manual Grid Trading: You place every buy limit, every sell limit, and every take profit by hand. When a trade opens, you monitor it. When it closes, you might need to replace the order. It’s incredibly time-consuming, easy to make mistakes, and stressful, especially with fast markets or tight grids. Honestly, manually managing a complex grid trading strategy is rarely practical.
- Automated Grid Trading: This is where a Grid Trading System for Forex truly shines. You use software – typically an Expert Advisor (EA) on MT4/MT5, or a pre-built bot on some exchanges. You set the rules (range, spacing, size, risk limits), and the software does all the work: placing orders, managing trades, 24/7. It ensures discipline and speed, making automation the go-to for serious grid traders employing this strategy.
Risk Management in Grid Trading
This part is crucial. Grid trading looks neat on paper, but it packs a hidden punch if you don’t manage the risks properly. Ignoring risk management in your grid trading strategy is like driving without brakes.
Importance of Risk Controls in Grid Strategies
The nature of grid trading means you will accumulate positions as the price moves against one side of your grid. If the market is ranging nicely, price eventually reverses, closing those trades. But if a strong trend takes hold and keeps going, the number of losing trades piles up fast. Your account balance can drop significantly (this is called drawdown). Without strict rules to cut your losses, one bad trend can wipe out all your previous profits and maybe your whole account. Risk control isn’t just important; it’s essential for the survival of any grid trading strategy.
Setting Stop Losses and Take Profits
- Take Profits: These are the easy part – usually set at the next grid line to lock in the profit from that interval. This is how the grid trading strategy makes money (when it works).
- Stop Losses: This is the tricky bit for grids.
- Stop on Each Trade?: Usually defeats the purpose of letting positions accumulate for a reversal. Not common in pure grids.
- Grid Boundary Stop: A hard stop-loss level placed significantly outside your defined grid range. If price smashes through your expected zone, you accept the grid failed and close all (or the losing side) positions.
- Drawdown Stop: A vital safety net. You decide beforehand: “If my total floating loss hits X% of my account, close everything.” This limits the maximum damage.
- Hedging (Advanced): If the grid goes deep into loss, some systems open an opposite trade to try and cap further losses from the original direction. This adds complexity.
The absolute key is having a pre-defined point where you say, “Okay, my assumption about this grid trading strategy was wrong, time to get out.”
Read More: hedging strategies in forex trading
Position Sizing and Capital Allocation
Perhaps the most critical risk control. The size of each trade in your grid must be tiny compared to your overall capital. Why? Because you might have 5, 10, or even more trades open at once if the price trends against you. Calculate the worst-case scenario: what if all your buy orders trigger and the price keeps falling to your catastrophic stop? Could your account survive that loss? If not, your position size is too big. Only allocate a portion of your total trading funds to any single grid trading strategy.
Managing Drawdowns and Overexposure
Drawdown – the dip in your account equity from its peak – is normal in grid trading as losing trades build up before (hopefully) turning around. You must know your maximum tolerable drawdown before you start. Overexposure happens when too many grid levels get triggered, making your total position huge and incredibly vulnerable to small further moves against you. Prevent this by: Using small trade sizes. Not having too many grid levels. Using wider spacing between orders. Having that non-negotiable stop-loss or max drawdown rule for your grid trading strategy.
Pros and Cons of Grid Trading
Like any tool, grid trading has its good and bad sides. Let’s weigh them up before you adopt this approach.
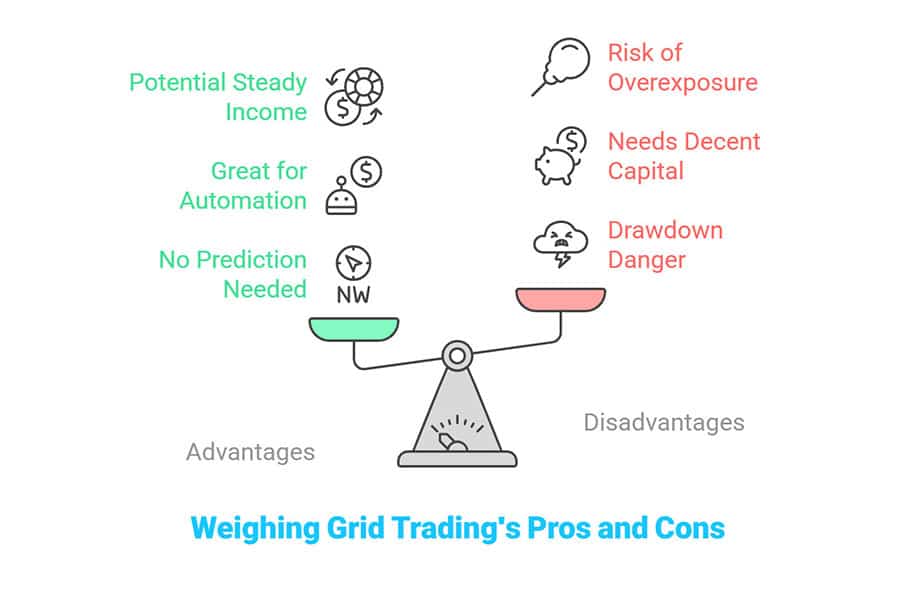
Advantages
- Doesn’t Need Direction Prediction (Range Grids): The classic grid aims to profit just from movement, not predicting the next big trend.
- Great for Automation: Perfect for trading robots (EAs), letting you run it systematically without emotions.
- Potential Steady Income Stream: In the right (ranging) market conditions, the grid trading strategy can generate frequent small profits.
- Takes Emotion Out (Mostly): Once set up, the system trades based on rules, not fear or greed (though managing the overall strategy still requires discipline).
Disadvantages
- Drawdown Danger: The big one. A strong trend moving against your grid can cause large, scary losses if not capped. This is the main weakness of the grid trading strategy.
- Needs Decent Capital: To handle potential drawdowns and margin for multiple open trades, you often need more starting capital than for other strategies.
- Risk of Getting Swamped (Overexposure): If too many orders trigger in a trend, your risk can balloon quickly.
- Market Dependent: Range grids stink in trends, trend grids stink in ranges. You need to match the grid trading strategy type to what the market is actually doing.
- Can Be Tricky to Tune: Finding the best spacing, range, and risk settings often takes a lot of testing and adjustment.
Read More: Long Term Forex Trading Strategy
When Grid Trading Works Best
Classic grid trading (the range-bound type) tends to shine when the market is:
- Going Nowhere Fast (Ranging): Stuck between clear support and resistance levels.
- Bouncing Around (Moderate Volatility): Enough movement to trigger orders and hit take-profits, but not so wild that it constantly breaks the range.
- Not Strongly Trending: The lack of a powerful, one-way move is key to avoiding the biggest risk associated with a grid trading strategy.
Trend-following grids, naturally, need a clear, ongoing trend to perform well.
Advanced Grid Trading Techniques
Once you’ve mastered the basics, you can explore more sophisticated twists on the Grid Trading Strategy.
Multi-Level and Dynamic Grid Systems
Some traders layer grids – maybe a short-term grid with tight spacing running alongside a longer-term one with wider spacing on the same instrument. Dynamic grids are cleverer, automatically adjusting things like the spacing between orders based on current market volatility (often measured by ATR). When volatility picks up, the grid might widen its spacing to avoid getting chopped up or opening too many positions too quickly.
Using Indicators to Optimize Grid Placement
Technical indicators can help you set up a smarter grid:
- Average True Range (ATR): Great for setting realistic spacing based on how much the market actually moves lately. Can also help define the overall range for your grid trading strategy.
- Moving Averages (MAs): Can help identify the trend (for trend-following grids) or act as a ‘center line’ to build a range grid around.
- Bollinger Bands / Keltner Channels: The bands naturally expand and contract with volatility, potentially providing dynamic range boundaries for your grid.
- Pivot Points / Support & Resistance: Using these well-established price levels to anchor your grid range or place specific grid orders can add a layer of technical validation.
Hedging Within a Grid System
This is more advanced. If a grid starts accumulating significant losses (e.g., price keeps falling, triggering many buy orders), a hedging strategy might automatically open an opposite (sell) position. The idea is to neutralize further losses from the original grid direction while you figure out what to do next. It sounds good, but hedging adds complexity, costs more in spreads/commissions, and needs a clear plan for eventually closing both the original trades and the hedge within your grid trading strategy.
Opofinance Services
Running strategies like the Grid Trading Strategy often benefits from a capable broker with modern tools. Opofinance, regulated by ASIC, provides features that could be helpful for grid traders:
- Choice of Platforms: Access popular platforms like MT4 and MT5, ideal for using Expert Advisors (EAs) to automate your grid system, alongside cTrader and their own OpoTrade platform.
- AI-Powered Tools: Explore tools like an AI Market Analyzer, AI Coach, and AI Support. These might offer insights to help analyze market conditions or potentially refine grid parameters.
- Community and Funding Options: Engage with social trading features or investigate proprietary (prop) trading opportunities if that aligns with your goals.
- Hassle-Free Banking: Make deposits and withdrawals securely using various methods, including crypto, with Opofinance charging zero fees on these transactions.

If you’re looking for a regulated broker with technological support for strategies like grid trading, check out what Opofinance offers. Learn more at Opofinance.com
Conclusion
So, the Grid Trading Strategy offers a structured, almost mechanical way to approach the markets. It shines when markets are choppy or range-bound, allowing potential profits from volatility itself, and it’s perfect for automation. But let’s be clear: it’s not a magic bullet. The risk of significant losses during strong trends is very real and must be actively managed with strict stop-losses and careful position sizing. It’s a tool that requires understanding, testing, and discipline. If you appreciate a systematic approach and are serious about risk management, exploring this grid trading strategy might be worthwhile.
Key Takeaways
- Grid trading sets buy/sell orders at intervals to profit from price swings.
- Best in ranging markets (classic grid) or adaptable for trends (trend grid).
- Define range, spacing, levels, and position size carefully.
- Forex is popular due to liquidity, 24/5 access, and automation (EAs).
- The biggest risk is large drawdown in trends; strict risk rules are non-negotiable for a grid trading strategy.
- Automation (bots/EAs) highly recommended for discipline and efficiency.
- Always backtest thoroughly and demo trade before risking real money.
How does grid trading compare to Martingale?
While some aggressive grid variations might increase position size after losses (similar to Martingale), standard grid trading doesn’t have to. The core grid idea is about capturing profits from price oscillations within levels, while Martingale focuses specifically on doubling bets after losses to recoup everything on the next win. Classic grid trading aims for consistent small wins per level. Both strategies can be dangerous in strong trends, but Martingale’s rapidly increasing position size generally makes it riskier.
Can grid trading work on assets besides Forex?
Absolutely. The concept can apply to cryptocurrencies, stock indices, or even individual stocks if they show enough movement and sometimes trade sideways. However, you need to consider the specifics of that market: transaction costs (commissions, fees), typical volatility (might need much wider spacing for crypto!), margin rules, and whether automation tools (bots/EAs) are readily available and effective for that asset class when designing your grid trading strategy.
What’s the difference between exchange bots & MT4/5 EAs?
Grid bots built into crypto exchanges or some broker platforms are usually simple to use. You pick a range, number of grids, and investment, and it runs. They’re convenient but often lack deep customization. Expert Advisors (EAs) on platforms like MT4/5 are much more powerful and flexible. You can code (or buy) EAs with very specific rules, custom indicators, dynamic adjustments, advanced risk management, or hedging logic far beyond basic bots. The trade-off is that EAs require more effort to set up, test, optimize, and often need a VPS to run reliably 24/7, especially for a complex grid trading strategy.