

Embarking on your trading journey can be both thrilling and a bit daunting. Choosing the right platform – one that’s user-friendly and equipped with the necessary tools – is the first and most crucial step. In this guide, we’ll introduce the OpoFinance app as an ideal option to begin this adventure. Join us as we walk you through everything in detail, from downloading and installing the app to creating your user account, getting familiar with the application environment, setting up a demo account, making your first practice trade, and leveraging educational resources. Our goal is to ensure that by following this guide, you’ll have a smooth and confident start in the world of trading.

Why is OpoFinance a Good Choice for Beginners?
OpoFinance stands out as a great choice for new traders for several reasons:
- Simple and Intuitive User Interface: The app is designed so that even individuals with no prior trading experience can easily navigate its various sections and use the available features.
- Comprehensive Educational Resources: OpoFinance offers a blog or learning section filled with useful articles, videos, and guides on trading fundamentals, market analysis, and various strategies. These resources help you keep your knowledge up-to-date.
- Demo (Practice) Account: The option to create a demo account allows you to practice trading in a simulated environment without risking real money, familiarize yourself with the platform, and test your strategies.
- Reliable Support: Access to a strong support team can be incredibly helpful when you’re just starting out.
Step 1: Downloading and Installing the OpoFinance App
1. Search in Your App Store:
- First, open your phone’s app store. If you’re using Android, go to the Google Play Store; if you’re on iOS, open the App Store.
- In the search bar at the top, type “OpoFinance” and press search.
2. Identify and Select the Correct App:
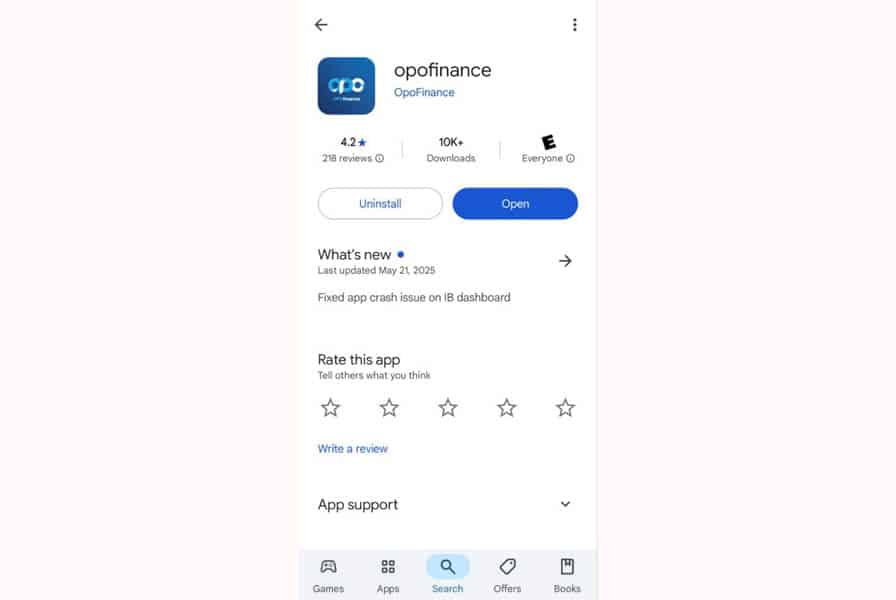
- After searching, a list of results will appear. Look for the app named “OpoFinance” with its official logo.
- Very Important Note: Pay close attention to the app’s developer name. The official developer for OpoFinance should be “Opofinance” or a similar name announced by the company itself. This helps prevent downloading fake and insecure versions.
- You can also check the number of downloads and the app’s rating. Reputable apps usually have a significant number of downloads (e.g., over 10,000 or 100,000) and a good rating (e.g., above 4 stars).
3. Install the App:
- Once you’ve found the correct app, tap the “Install” button in Google Play or “Get” and then “Install” in the App Store.
- Wait for the download and installation process to complete. This step might take a few seconds to a few minutes, depending on your internet speed.
- After installation is finished, an “Open” button will appear.
Step 2: Creating Your OpoFinance Account
1. Open the Application:
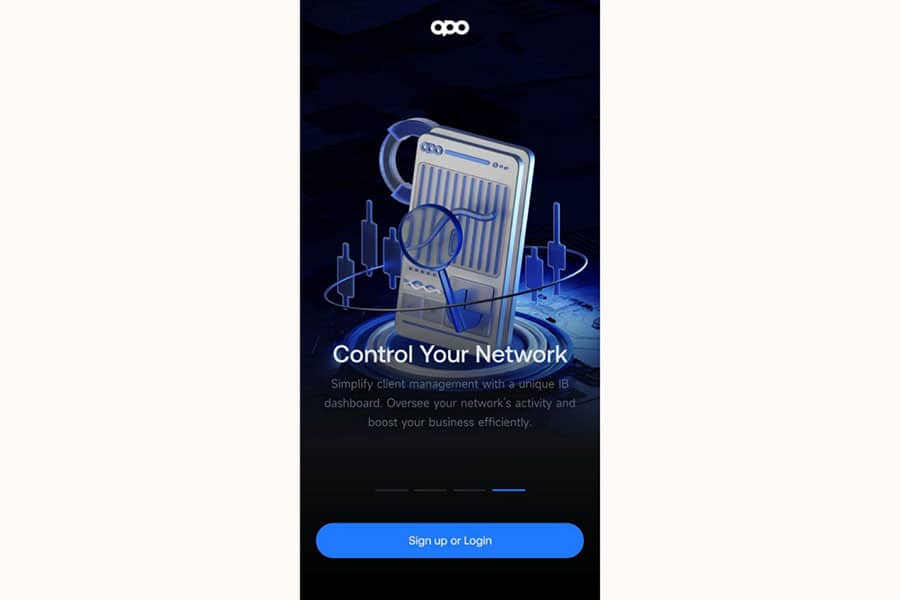
After successful installation, open the OpoFinance app by tapping its icon on your phone’s home screen or via the “Open” button in the app store.
2. Navigate to the Sign-Up Page:
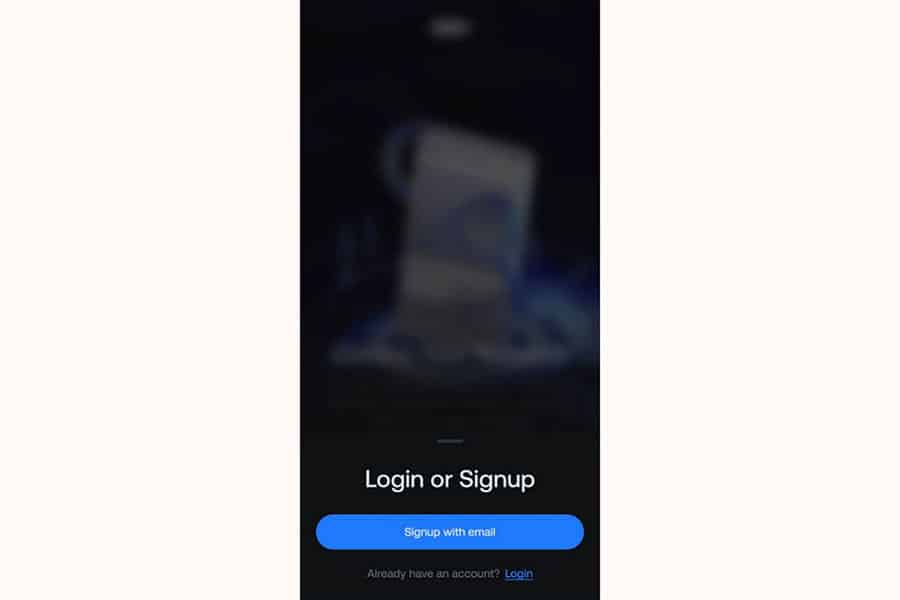
Upon opening the app, you’ll see a blue “Sign up or Login” button. Tap this button.
On the next screen, titled “Login or Signup,” select the “Signup with email” option to create a new user account. If you already have an account, you can tap the “Login” link.
3. Complete the Registration Form (Step 1: Personal Information):
After selecting “Signup with email,” you’ll be directed to the “Sign up – Step 1: Personal information” page. Carefully enter the requested information:
- First name: Enter your first name (as it appears on your ID).
- Last name: Enter your last name (as it appears on your ID).
- Referral ID (Optional): If you have a referral code, you can enter it here. This field is optional.
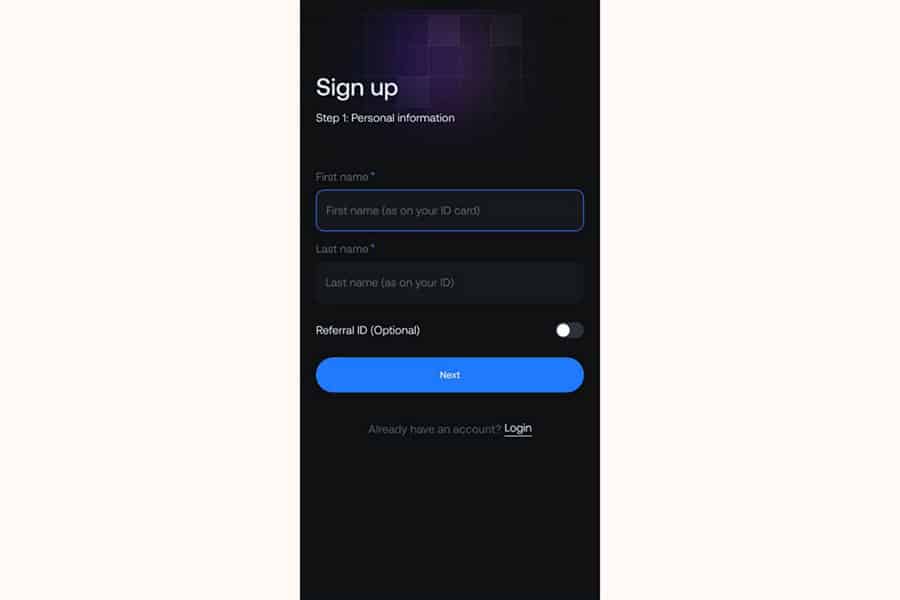
After filling in these fields, tap the blue “Next” button.
4. Complete the Registration Form (Step 2: Set Your Password and Contact Information):
You will now proceed to the “Sign up – Step 2: Set your password” page. Complete the following information:
- Email Address: Enter your valid email address. This email will be used for account verification and future communications.
- Phone Number: Enter your mobile phone number. The country code (e.g., +98 for Iran) will be pre-selected or selectable.
- Password: Choose a strong password for your account. Your password must meet the following criteria:
- Be at least 8 characters long.
- Include at least one uppercase English letter.
- Include at least one lowercase English letter.
(It’s also recommended to use a combination of numbers and symbols like @, #, $, etc., for added security, although these were not explicitly mandatory in the image.)
- Confirm Password: Re-enter your chosen password in this field to ensure its accuracy.
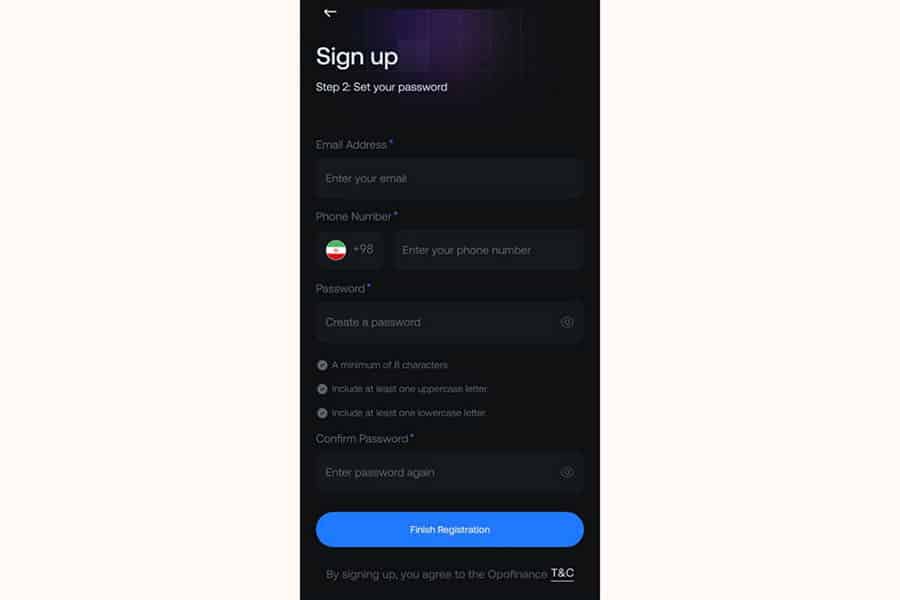
Note that at the bottom of this page, it states, “By signing up, you agree to the Opofinance T&C,” with “T&C” linked to the Terms and Conditions page.
5. Finalize Registration:
After completing all required fields in the second step and ensuring the accuracy of the entered information, tap the blue “Finish Registration” button.
6. Enable Biometric Login (Optional):
Some applications, after a successful first login, offer the option to enable login using biometric information such as a fingerprint or Face ID. If you wish, you can activate this feature for quicker and more secure access to your account in the future.

Step 3: Identity Verification (KYC) via Sumsub
After creating your user account, you’ll need to complete the identity verification process to access all app features.
Read More: Choosing a Forex Broker
1. Start the Verification Process in the App:
Upon logging into the app, you’ll encounter a message titled “!Identity Verification Required,” prompting you to verify your identity to access all app features. Tap the blue “Verify now” button.
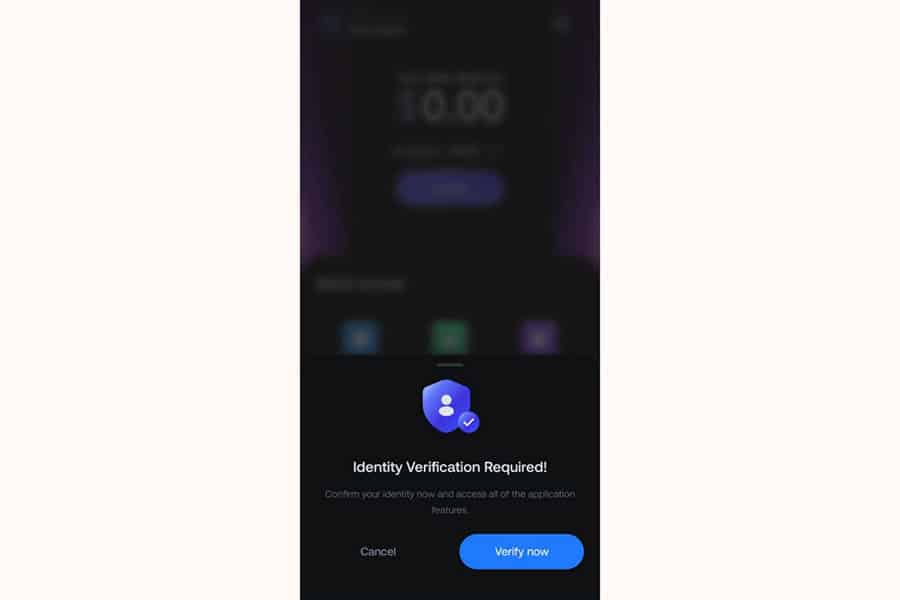
Alternatively, you can access the verification section through your user profile menu or app settings.
2. “Verification Steps” Page:
You will then be directed to a page titled “Verification Steps.” This page displays the verification levels required to unlock all features:
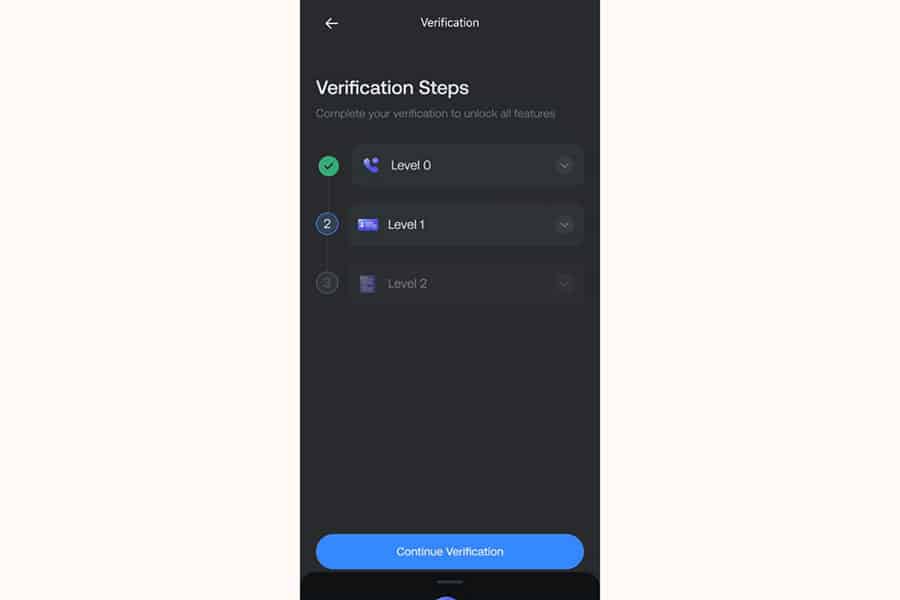
- Level 0: Phone Verification. (In the image, this step is marked with a green check and indicated as completed – labeled with a 1).
- Level 1: The next level of verification (labeled with a 2 in the image, further details in the next step).
- Level 2: A higher level of verification (labeled with a 3 in the image).
To proceed, tap the blue “Continue Verification” button.
3. Completing Verification Steps :
On the “Complete your verification” page, you’ll complete the following steps:
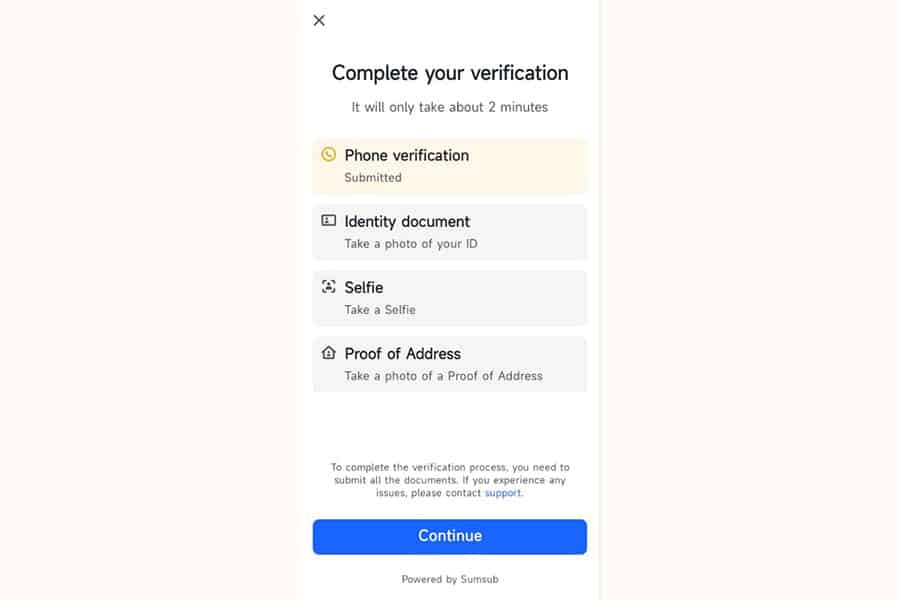
- 1. Phone verification: This step is marked as “Submitted” in the image. If not completed, do so via your user panel.
- 2. Identity document: Here, you upload an image of your ID (“Take a photo of your ID”). One of the following documents is sufficient:
- Front and back of your national ID card or driver’s license.
- The first page of your birth certificate or a valid passport.
- 3. Selfie: Take a selfie (“Take a Selfie”). This is done panoramically through the user panel. If you encounter issues, you can take 3 selfies from 3 angles (right profile, left profile, and full face) and send them to the verification department via the announced contact methods.
- 4. Proof of Address: Upload an image of a document to prove your address (“Take a photo of a Proof of Address”). One of the following is sufficient (residency documents can be in your name, or your father’s, mother’s, or spouse’s name):
- Vehicle registration (green card) or insurance policy with a valid date and exact address.
- Property deed or rental agreement with a valid date and real estate agency stamp.
- Business license with a valid date.
- Utility bills (water, electricity, or landline phone) from the last 3 years, showing name, address, and postal code (you can download new bills from the respective utility company’s website).
After preparing the above items for upload, or to start the upload process for each section, tap the blue “Continue” button at the bottom of the page. This will direct you to the Sumsub interface for uploading and submitting documents.
4. Submit Documents and Await Confirmation:
After uploading all required documents in the Sumsub interface, they will be sent for review.
The processing and final confirmation time for documents varies. You can track your verification status within the app.
5. Verification Completion and Full Access:
Upon successful verification of your documents, your identity verification will be complete, and you will have access to all app features.
Contacting the OpoFinance Verification Department:
If you need further assistance or encounter any issues during the verification process, you can contact the relevant department using the following methods:
- E-mail: kyc@opofinance.com
- WhatsApp: Click to send a message: +44 1244 94 1224
Important Notes:
- “To complete the verification process, you need to submit all the documents.”
- Ensure your document images are clear, complete, and legible to expedite the review process.
- If you face any problems during the process and need more help, in addition to the methods above, you can use the “support” option usually found at the bottom of the verification process screen (as per image, below “Powered by Sumsub”).
Step 4: Getting Acquainted with the OpoFinance App Interface
After successfully logging into your account, you’ll see the main application interface. Familiarizing yourself with the different sections at this stage will help you use the app’s features easily.
1. Main Dashboard (Home)
- First Screen: After logging in, the Main Dashboard (Home) is the first screen you see. This section displays key information about your account.
- Welcome and User Info: At the top, you’ll see a message like “Welcome back [Your Username]” and your initials. On the top right, there’s a headphone icon for accessing support.
- Your Main Balance: Shows your current account balance.
- Account ID: Your user account number is displayed along with an icon to quickly copy the ID.
- Deposit Button: A large, clear blue button for depositing funds into your account is located here.
- Quick Access: Further down, there’s a “Quick access” section with shortcuts to important operations and sections:
- Add: Blue icon with a plus sign, likely for adding a new account or other items.
- Accounts overview: Green icon, for viewing a summary of all your accounts.
- IB Dashboard: Purple icon, for accessing the Introducing Broker dashboard if you use this feature.
- Transfer: Blue icon, for transferring funds between your internal accounts.
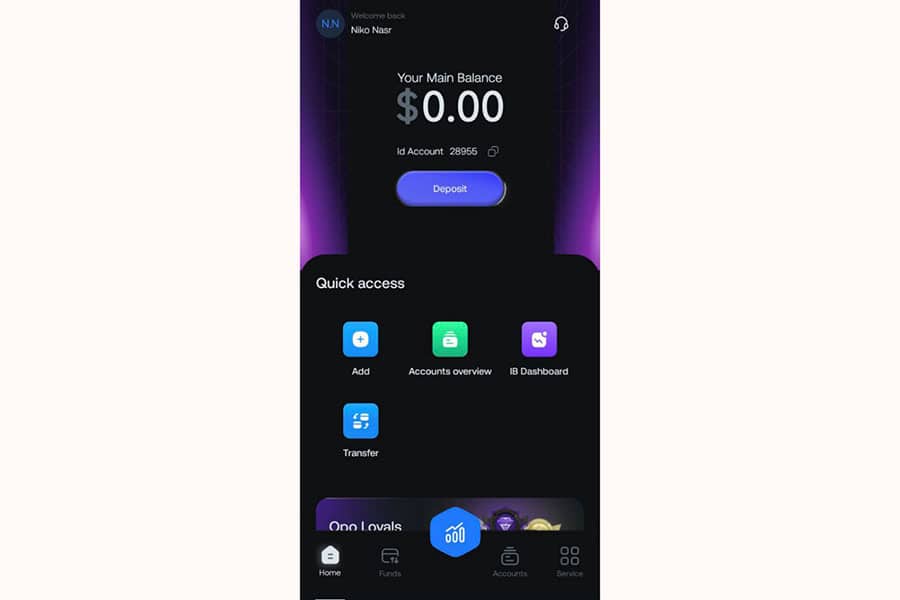
2. Navigation Bar and Main Sections
At the bottom of the screen, the Navigation Bar provides quick access to the main sections:
- Home: House icon, to return to this main dashboard.
- Funds: Arrow icons for transfer, to manage deposit, withdrawal operations, and transaction history. Selecting this opens the “Funds” page, which includes:
- Deposit: To add funds to your account.
- Withdraw: To withdraw funds from your account.
- Transfer: To transfer funds between accounts.
- Transactions: Displays account transaction history.
- Central Icon (Trade): A prominent hexagonal icon with a Candlestick Chart symbol is in the center of the navigation bar. Selecting this takes you to the trading page.
- Accounts: Document icon, for viewing, managing, and creating trading accounts (real and demo). Selecting this opens the “Account Overview” page where you can:
- View your list of Active and Not Active accounts.
- See information for each account (account number, type, balance, etc.).
- Open a new account using the “Create Account” button.
- Service: Four-square icon, for contacting the support team or accessing other services and guides.
3. Trade/Charts Section
By selecting the central (Trade) icon in the navigation bar, you access the trading and charts page. On this page:
- You can search for and select different trading instruments (like the XAUUSD currency pair).
- View the price chart of the selected instrument.
- Add various technical analysis tools (like indicators, trend lines, Fibonacci tools, etc.) to the chart.
- Select different timeframes (like 1 minute, 5 minutes, 1 hour, daily, etc.) for chart display.
- Change chart appearance settings (like colors, display type, etc.).
- Finally, use the available tools to place Buy or Sell trades.
Additional Tips:
- Use the “Create Account” button on the “Account Overview” page to easily open a new trading account.
- Use the “Funds” section to deposit or withdraw funds.
- On the trading page, use technical analysis tools and different timeframes to analyze charts and make better trading decisions.
Step 5: Creating a Demo Account and Making Your First Practice Trade
A Demo Account is an excellent tool for practicing and getting familiar with the platform without any financial risk. We’ll update the steps based on the provided images:
1. Access the Accounts Section
- From the navigation bar at the bottom of the screen, select “Accounts” (document icon).
- On the “Account Overview” page that opens, you’ll see your Active and Not Active accounts.
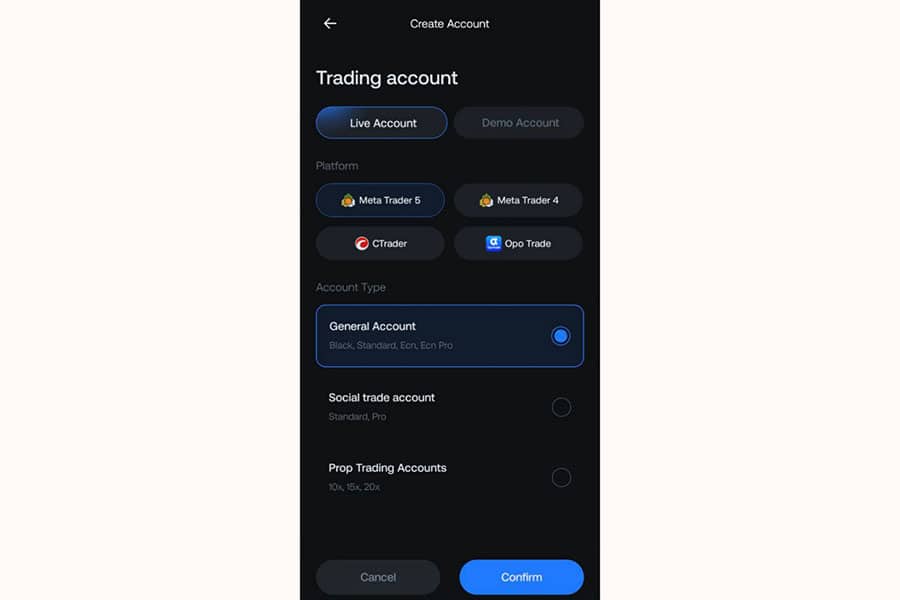
2. Create a New Account
- On the “Account Overview” page, tap the “Create Account” button located at the top of the page.
3. Select Demo Account Type
On the “Create Account” page that opens, you’ll see the following options:
- Trading Account:
- Live Account
- Demo Account: Select this option.
- Platform: Choose your preferred trading platform:
- MetaTrader 5 (MT5)
- MetaTrader 4 (MT4)
- cTrader
- Opo Trade
- Account Type: Select the type of demo account:
- General Account (Black, Standard, ECN, ECN Pro)
- Social Trade Account (Standard, Pro)
- Prop Trading Accounts (10x, 15x, 20x)
After making your selections, tap the blue “Confirm” button at the bottom of the page.
Read More: Demo vs Live Forex Trading
4. Confirmation and Demo Account Details
After completing the information and tapping “Confirm,” your demo account will be created.
The login details for the demo account (account number and password) are usually displayed instantly or sent to your email. Save this information for logging into the trading platform (if you are using MetaTrader). If you are using OpoFinance’s internal platform, the demo account will automatically be added to your list of accounts.
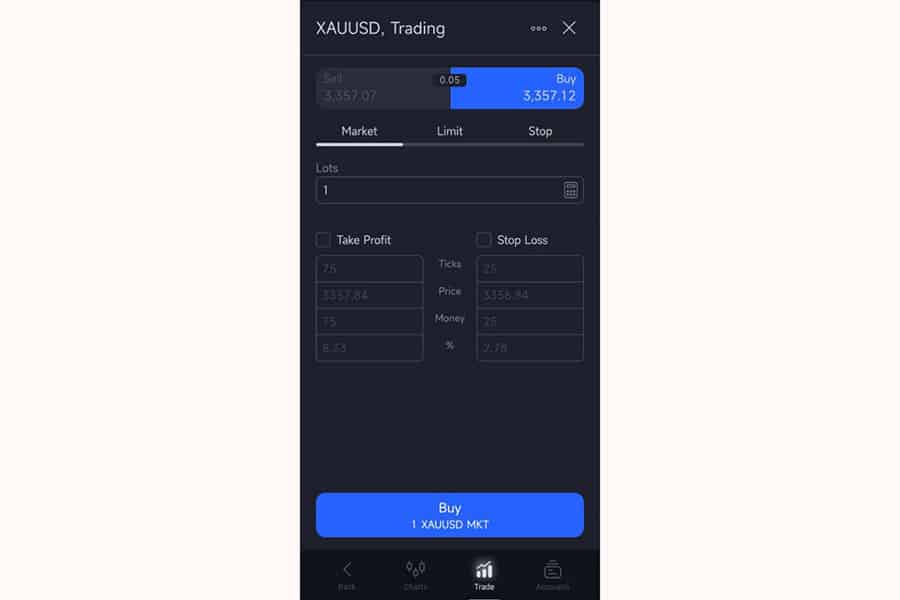
5. Making Your First Practice Trade
- From the bottom navigation bar, select the central “Trade” icon (candlestick chart) to go to the trading page.
- Select Instrument: Search and select your desired trading instrument (e.g., XAUUSD for gold).
- Analyze Chart (Optional but Recommended): Before trading, examine the price chart. Try using simple technical analysis tools like support and resistance lines or a basic indicator.
- Open Trade Window: After selecting the instrument, tap on the chart and then select the “Trade” icon to open the trade window.
- Specify Trade Details:
- At the top of the page, you’ll see options for Market (instant execution), Limit (pending order), and Stop (pending order).
- Specify the trade volume (Lots).
- If desired, set Take Profit and Stop Loss levels. You can enter the price manually or use suggested values.
- After careful consideration, if you predict the price will rise, tap “Buy,” and if you predict it will fall, tap “Sell.”
6. View and Manage Open Trades
- After executing the trade, you can view it in the “Positions” or “Open Trades” section. Here, the real-time profit or loss of the trade is displayed.
- From this section, you can also modify or close your open trades.
With this updated visual guide, I hope you can easily create a demo account and successfully make your first practice trade.
Step 6: Utilizing Educational Resources on the OpoFinance Blog
One of the key advantages of OpoFinance is access to educational resources beneficial for traders at all knowledge and experience levels. Using these resources helps you enhance your knowledge and make more successful trades.

1. Accessing the OpoFinance Blog:
- To access educational articles and analyses, visit the OpoFinance blog:
- blog.opofinance.com/en
2. Types of Educational Content Available on the Blog:
The OpoFinance blog includes a variety of content categories:
- Forex:
- Basic concepts of the Forex market
- Trading strategies
- Capital and risk management
- Technical and fundamental analysis
- Cryptocurrencies:
- Tutorials related to cryptocurrencies
- Analysis and review of various projects
- News & Analyses:
- Latest financial market news
- Daily and weekly analyses
- Forecasts of important economic events
- Education:
- A collection of articles and guides for different levels of traders
- Forex Brokers:
- Comparison and review of different brokers
- Economy:
- Articles related to macroeconomics and its impact on markets
- Trading Strategy:
- Learning and reviewing various trading strategies
By reading the articles and analyses available on the OpoFinance blog, you can increase your knowledge in financial markets and make better trading decisions.
Read More: Comprehensive Guide to Various Forex Trading Methods
Conclusion
As you’ve seen in this comprehensive guide, OpoFinance has endeavored to make the process of entering the trading world as simple and smooth as possible. From the easy download and installation of the app, quick and hassle-free account creation, and familiarization with an intuitive and understandable user interface, to the ability to create a demo account for risk-free practice and access to rich educational resources – all these features combine to ensure that you, as a new trader, have a positive and constructive experience.
Remember that trading is a skill, and like any other skill, it requires learning, practice, and patience. Use the demo account as your playground, learn from your mistakes, and always keep your knowledge up-to-date. OpoFinance has provided you with the necessary tools; now it’s your turn to start this journey with confident steps.